Tutorial Part 2 - Production setup with local ARC datadelivery
Tutorial configuration values
In the “zero-conf” setup in the previous step no other user then your self can submit jobs to ARC, and the job will only run as a fork. There are minimally 5 steps to configure ARC for a production ready server. These are:
Step 3. Tell ARC what LRMS queues to use
Step 4. Enable ARC data-staging service and tell ARC what cache directory to use
Step 5. Set up the authentication and authorization including external to local user mapping rules
That will be it. And we will finally test the setup by submitting a couple of test-jobs .
We will be using some example ARC configuration parameter values suited to fit with the test-infrastructure set up in relation to the EGI 2023 ARC tutorial. You will naturally have to replace these values with the actual values for your specific system. Here is an overview of these for convenience:
ARC session directory:
/grid/session1ARC control directory:
/grid/controlARC cache directory:
/grid/cache1batch system (LRMS):
slurmorcondorname of batch system queues:
arc-tutorialandwlcgcompute node scratch directory:
/scratch
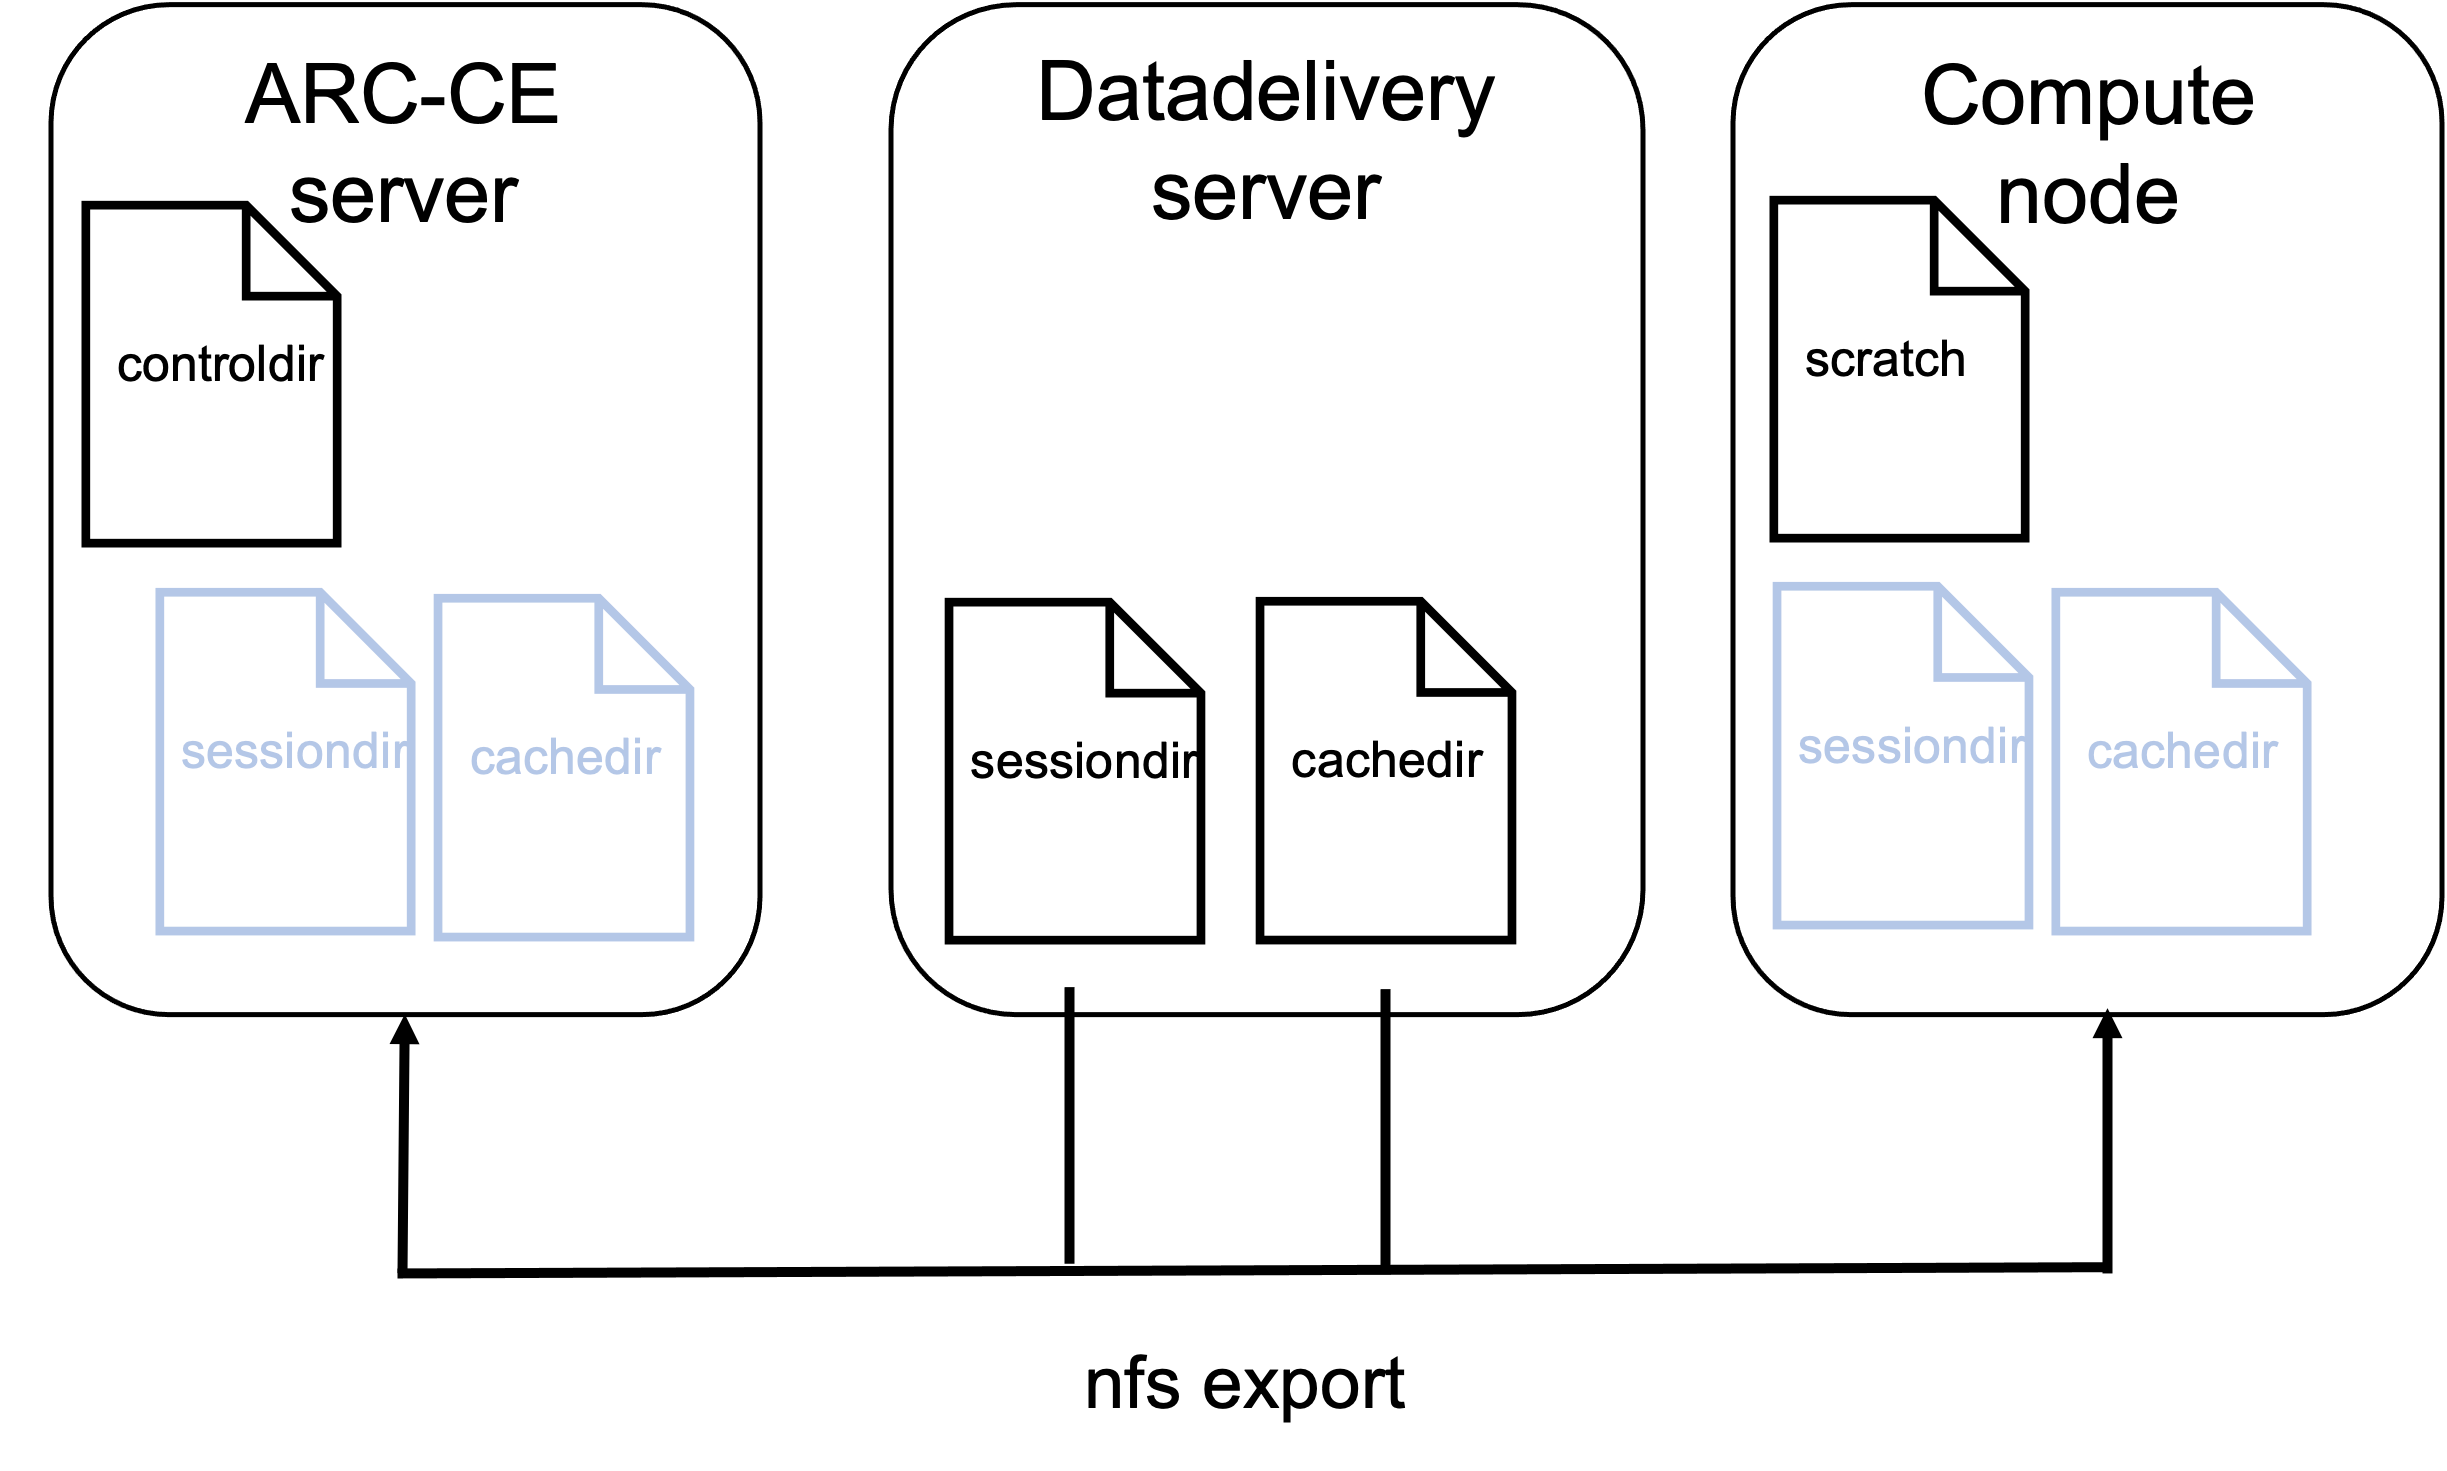
Fig. 9 Overview of server and file system for ARC example cluster
Step 1. Tell ARC what LRMS system you are using
In this tutorial we either user slurm or the htcondor batch systems.
Simply replace the “zero-conf” fork lrms with slurm or condor like this:
[lrms]
lrms = slurm
Or if you are on HTCondor:
[lrms]
lrms = condor
ARC supports many other batch-systems - for details see arc.conf reference: [lrms]
Step 2. A-REX directories - [arex] block
In a production system we would want to decide where the ARC related files and folders should live. The relevant A-REX directories are at least the control-directory, the session-directory and the cache directory for data-delivery service. We will adress the two first ones here, and the cache directory in Step 4
Controldir
The control directory holds A-REX internal job metadata files and is local to the ARC-CE (i.e. not shared with the compute nodes). The default value is /var/spool/arc/jobstatus. We will instead point to /grid/control in this example, which correspond to the folders prepared on the test-servers if you are following along as part of an ARC workshop. If you are setting up your clusters you use the dedicated path for the ARC control directory that you have prepared (or just keep the default). ARC will automatically create the directory if it does not already exist. There can only be one single control directory.
Example of the control directory file tree that gets created by ARC-CE:
/grid/control/
├── accepting
├── accounting
├── delegations
├── dhparam.pem
├── dtr.state
├── finished
├── gm.fifo
├── gm.heartbeat
├── info.xml
├── jobs
│   └── cc4
│       └── 197
│           └── f52
│               └── 3c6
│                   ├── description
│                   ├── diag
│                   ├── errors
│                   ├── grami
│                   ├── input
│                   ├── input_status
│                   ├── local
│                   ├── output
│                   ├── proxy
│                   ├── statistics
│                   └── xml
├── log
├── processing
├── restarting
└── version2
Visit Internal files of A-REX for more details.
Sessiondir
The jobs working directories are created as subdirectories of the ARC session directories. Each job has its dedicated subfolder session directory identified with the ARC job id. They hold all the input, output, executables and log-file for the job. There can be multiple ARC session directories. The default value is /var/spool/arc/sessiondir but we will change it to /grid/session1 in this example to demonstrate a non-default value. ARC will automatically create the directory if it does not already exist.
Example of the file tree of the session directory where you see two jobs present with their corresponding working directories and files.
/grid/session1/
├── cc4197f523c6
│   ├── runhello.sh
│   ├── output.text
│   ├── stderr
│   └── stdout
├── cc4197f523c6.comment
├── cc4197f523c6.diag
├── 9b57049fdc51
│   ├── runhello_inputfile.sh
│   ├── output.text
│   ├── localfile
│   ├── remotefile
│   ├── stderr
│   └── stdout
├── 9b57049fdc51.comment
This is how the arex block now looks after adding our systems directories:
[arex]
controldir = /grid/control
sessiondir = /grid/session1
For more details, see arc.conf reference: controldir and sessiondir.
Configure a local compute scratch directory
To avoid exessive traffic on the shared filesystem it is adviced to configure a local scratch directory on the compute nodes. If a scratch directory is configured, A-REX will move the jobs files from the shared session directory onto the local scratch directory on the compute node once the job starts. The only file that is not moved is the jobs log-file, this is simply soft-linked to the compute-node. Note that if the ARC cache is used, the input-file links are simply moved to the scratch directory. The outputfiles are created in the compute nodes scratch directory while the job is running.
Once the job is finished, the files including the output-files are moved back into the jobs session directory.
We configure ARC for using a local scratch directory on the compute nodes by adding the scratchdir directory path to the [arex] block. In this example the path used is /scratch. The [arex] block now look like this:
[arex]
controldir = /grid/control
sessiondir = /grid/session1
scratchdir = /scratch
For more details about the configuration option, see arc.conf reference: scratchdir. In addition, for details on how the job scratch area works, see: Job scratch area.
Step 3. Tell ARC what LRMS queues to use - [queues] block
Each queue on the cluster that should receive jobs from ARC must be represented and described by a separate queue block. The queue_name should be used as a label in the block name. In case of fork, or other LRMSes with no queue names, just use any unique string. In the case of SLURM the queue_name must match an existing SLURM partition.
There can be several queues, for instance a queue for the ordinary grid jobs, and a separate queue for low priority preemteable grid jobs, or for instance a separate queue for different experiments.
The queues can also be configured to accept jobs from certain authgroups, which we will see in Step 5-3. In the example shown here, all authgroups can use all queues as no authgroups are specified.
[queue: arc-tutorial]
comment = Queue for ARC test jobs

[queue:wlcg]
comment = Queue for WLCG jobs
Consult the arc.conf reference [queue] for more details.
Step 4. Enable ARC data-staging service and tell ARC what cache directory to use
With the ARC data-staging enabled, ARC will make sure to fetch any remote input files to the ARC server, and the job will be forwarded to the LRMS system only once all files are downloaded.
The ARC cache is a must when you have data-staging enabled. The datadelivery service will check the ARC cache to see if the file is already downloaded, and if it is, will not perform a new download, but simply link the file to the current job using it.
Example of the file tree of the cache directory is shown below. We see the data folder holding the actual data files, in addition to the joblinks folder identified by the ARC id where the hardlinks to the cached data files are stored.
/grid/cache1/
├── data
│   ├─ 15
│   │  └── ed291ec90b64fe7c153c74f65af09f0db2b70e
│   │  └── ed291ec90b64fe7c153c74f65af09f0db2b70e.meta
│   └──31
│      └── b9f10eb0968c50246534619de8c78e42a46156
│      └── b9f10eb0968c50246534619de8c78e42a46156.meta
└── joblinks
    └── cc9197f523c6
        └── remotefile
To configure the cache and the data-staging, right below the [arex] block add the follow (close to minimal) configuration:
[arex/cache]
cachedir = /grid/cache1

[arex/data-staging]
logfile=/var/log/arc/datastaging.log
Note
We enable the central datastaging.log here, otherwise, the datataging logs will only reside on any remote data delivery servers, and it is convenient to have them accessible from the ARC-CE itself.
It is important also to set up cache-cleaning by enabling the see [arex/cache/cleaning] block. However, for the sake of simplicity, we will not do that in this tutorial.
Check the [arex/cache] and [arex/data-staging] for details.
Restart ARC after configuration changes
For any configuration changes, ARC must be restarted. Before proceeding, do
$ arcctl service restart -a
Submit a job using tokens
Get a token
Generate your token, and store it as an environment variable on the ARC client-machine. We will use the ARC test-jwt token in this tutorial. But if you have a real token, you can use that as long as you also configure ARC to accept it - see step5_auth.
export BEARER_TOKEN=$(arcctl test-jwt token)
In this tutorial we will submit two test-jobs, one without any datastaging, and one with datastaging. If you are using the ARC client machine or one of the ARC test-sites set up in context with an ARC workshop, the test-job descriptions are already present in the /home/almalinux/arcjob_tutorial folder.
Note
If you are on your own client server (and not a client in connection to a live tutorial workshop), please download and untar the files (job description, input-files, executable) - or use your own custom test-jobs. Note that to use your own remote ARC client you must ensure that the ARC-CE accepts the token that you will use, and that the tokens issuer CA is installed on both server and client. If you are using a test-jwt on the client Follow the steps here to set up the required trust between the ARC-CE and ARC client. If you have a real IGTF compliant host certificate on the ARC client, the previous steps deploying the igtf-ca’s on the ARC-Ce should be all you need to do: arcctl deploy igtf-ca classic.
Submit a job with no inputdata
In this example we are assuming you are submitting the job on the client installed on the ARC-CE server itself. Replace $(hostname) with your ARC-CE endpoint if this is not the case.
The executable looks like this:
#!/bin/sh
echo "Am sleeping for 60 seconds"
sleep 60
exit
And the job-description looks like this:
&(executable=runhello.sh)
(jobname=hello_test)
(stdout=std.out)
(stderr=std.err)
(cpuTime="1 hours")
(memory="1000")
(outputfiles=("output.txt" ""))
Submit the job (make sure your token is still valid, if not, generate a new one - see token generation).
arcsub -d DEBUG -C $(hostname) hello.xrsl
Submit a job with local and remote inputdata
Now let’s submit a job that requires ARC to stage data for us. We will use this executable:
#!/bin/sh
echo "Computing md5sum for localfile";md5sum localfile>>output.txt;
echo "Computing md5sum for remotefile";md5sum remotefile>>output.txt;
echo "Am sleeping for 60 seconds"
sleep 60
exit
And this job-description file:
&(executable=runhello_inputfile.sh)
(jobname=hello_test)
(stdout=std.out)
(stderr=std.err)
(cpuTime="1 hours")
(memory="1000")
(inputfiles=
("localfile" "file.txt")
("remotefile" "http://download.nordugrid.org/repos/6/rocky/9/source/updates/repodata/repomd.xml"))
(outputfiles=("output.txt" ""))
Submit the job (make sure your token is still valid, if not, generate a new one - see token generation)
arcsub -d DEBUG -C $(hostname) hello_inputfile.xrsl
Inspecting the job
Let us inspect what happens when the job runs in the production setup
The controldir, sessiondir, cachedir are used as configured - we see files populated as the jobs are running. We also see that the owner of the files in the sessiondir and cachedir is the arcuser as configured.
[almalinux@arc.example.org ~]$ ls -lhrt /grid/session1/
total 28K
-rw-------. 1 arcuser arcuser 274 May 24 15:53 9be514eedc51.comment
drwx------. 2 arcuser arcuser  54 May 24 15:54 9be514eedc51
[almalinux@arc.example.org ~]$ ls -lhrt /grid/cache1/
total 0
drwxr-xr-x. 3 root root 16 May 24 15:24 data
drwxr-xr-x. 2 root root  6 May 24 16:04 joblinks
[almalinux@arc.example.org ~]$ ls -lhrt /grid/cache1/joblinks/
total 0
drwx------. 2 arcuser arcuser 24 May 24 16:12 9be514eedc51
[almalinux@arc.example.org ~]$  ls -lhrt /grid/control/jobs/
total 0
drwxr-xr-x. 4 root root 28 May 24 15:53 9be
A few seconds after the job is submitted with arcsub - we can check Slurm to see if the job is running:
[almalinux@arc.example.org ~]$ squeue
             JOBID PARTITION     NAME     USER ST       TIME  NODES NODELIST(REASON)
                 8 arc-tutor hello_te  arcuser  R       0:02      1 c1
Indeed, running as with slurmid 8 in the arc-tutorial partition and as arcuser as expected, and on the compute node c1.
Logging into the compute node c1 we can check the scratch folder for this job:
[almalinux@c1 ~]$ sudo ls -lhrt /scratch/9be514eedc51/
total 12K
-rw-------. 1 arcuser arcuser  33 May 24 15:53 localfile
-rwx------. 1 arcuser arcuser 197 May 24 15:53 runhello_inputfile.sh
lrwxrwxrwx. 1 arcuser arcuser  45 May 24 15:53 remotefile -> /grid/cache1/joblinks/9be514eedc51/remotefile
lrwxrwxrwx. 1 arcuser arcuser  35 May 24 15:53 std.out -> /grid/session1/9be514eedc51/std.out
lrwxrwxrwx. 1 arcuser arcuser  35 May 24 15:53 std.err -> /grid/session1/9be514eedc51/std.err
-rw-------. 1 arcuser arcuser  89 May 24 15:53 output.txt
On the compute node, the job is running in the /scratch directory, and files are owned by the arcuser as configured
We see that the file that ARC staged from a remote source is saved in the ARC cachedir and is linked in /scratch
We see that the jobs output/error files
std.outandstd.errstill live in the ARC-CE sessiondir as expected, ARC does not move these filesWe see that the outputfile produced by the job executable:
output.txtis created in the scratch directoryOnce the job is finished all files will be moved back to the ARC-CE sessiondirectory.